DNS misconfiguration is one of the most common yet overlooked vulnerabilities in web infrastructure today. A single misplaced record or forgotten zone entry can expose your domain to hijacking, email spoofing, or prolonged downtime. For IT administrators and webmasters, running a regular domain security scan is not optional; it is a professional responsibility.
Whether you manage five domains or five hundred, understanding how to identify and fix DNS issues will save you hours of troubleshooting and prevent real security incidents. This guide walks you through a practical, step-by-step process for diagnosing and resolving DNS misconfigurations.
We will cover everything from initial auditing to final verification. If you want a broader overview of how scanning fits into your security workflow, our guide on domain security scanning provides the full picture. Let's get your DNS records in order.
Key Takeaways
- Always audit your DNS records before making any changes to avoid cascading errors.
- Mismatched MX and SPF records are the most frequent cause of email delivery failures.
- Use multiple DNS lookup tools to cross-verify propagation across global nameservers.
- An expired or misconfigured SSL certificate check often reveals deeper DNS problems underneath.
- Document every DNS change in a changelog to simplify future troubleshooting and team collaboration.
Step 1: Audit Your Current DNS Records
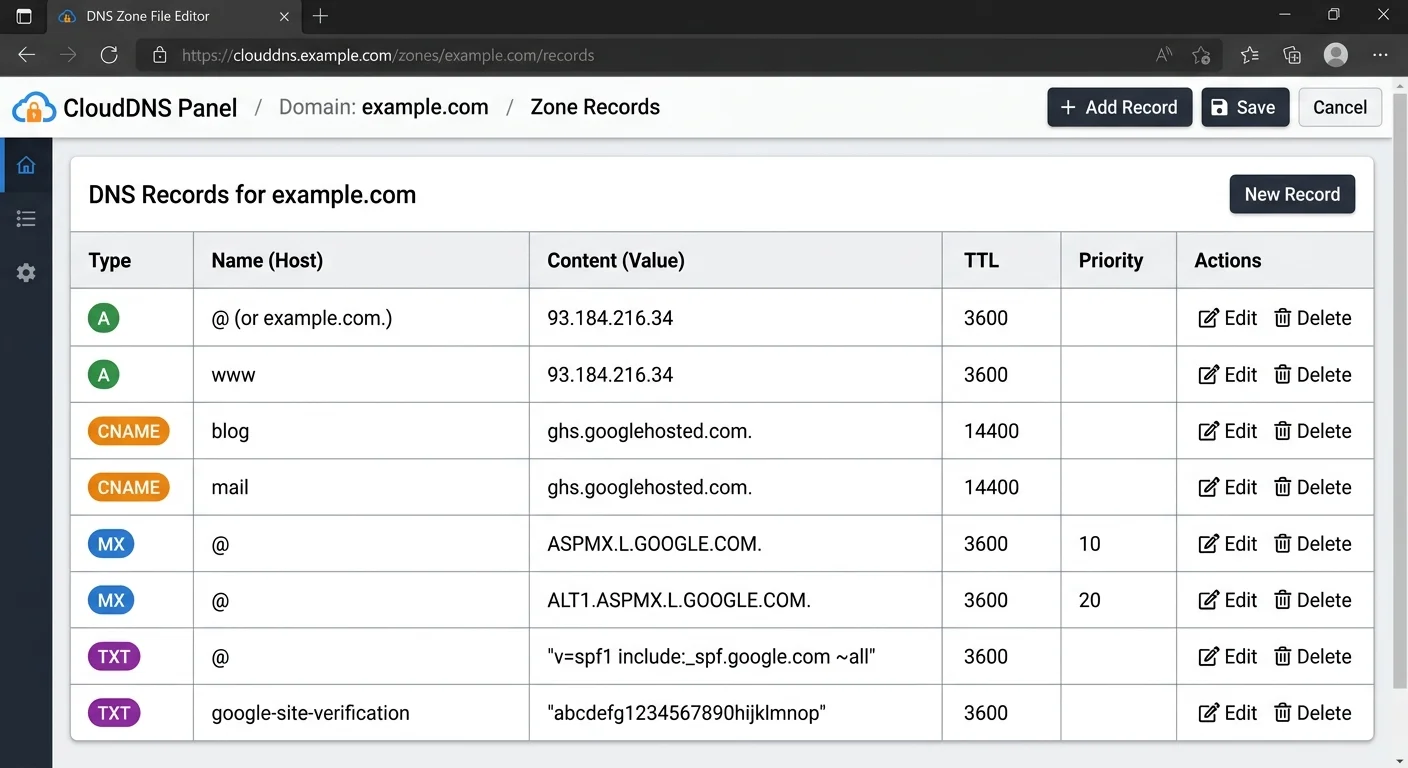
Before you touch a single record, you need a complete snapshot of your current DNS configuration. Log into your domain registrar or DNS hosting provider and export all zone records. This includes A, AAAA, CNAME, MX, TXT, NS, and SRV records. If your organization uses multiple providers (common when CDNs or email services are involved), gather records from each source and compile them into a single spreadsheet for comparison.
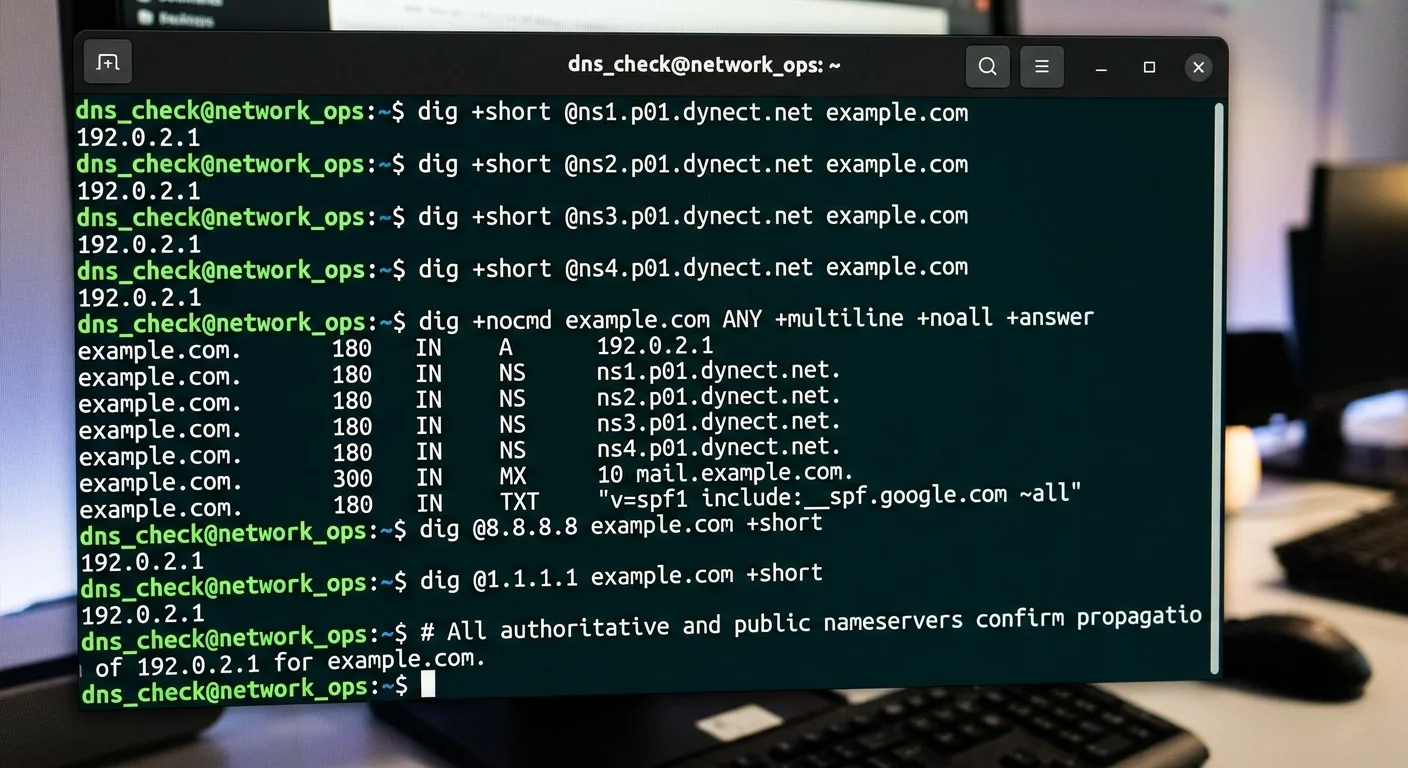
Run a domain vulnerability scan using command-line tools like dig or nslookup to query your authoritative nameservers directly. Compare those results against what your registrar panel shows. Discrepancies here often indicate stale records, unauthorized changes, or synchronization failures between primary and secondary nameservers. This baseline document becomes your reference point for every fix you make going forward.
Export your DNS records to a CSV file and store it in version control so you can track every change over time.
What to Look for in Your Audit
Pay close attention to orphaned records pointing to decommissioned servers. These dangling DNS entries are a favorite target for subdomain takeover attacks. If an A record points to an IP address you no longer control, an attacker can claim that IP and serve malicious content on your subdomain. Check for duplicate CNAME entries, which can cause resolution conflicts, and confirm that your NS records match what the parent zone delegates.
At the end of this step, you should have a complete inventory of every DNS record associated with your domain, annotated with its purpose. Any record you cannot explain or justify should be flagged for investigation. This audit alone often reveals 30% to 50% of existing misconfigurations before you even start targeted diagnostics.
Also Check: How Backlink Analysis Boosts Domain SEO Strength
| Record Type | Purpose | Common Misconfiguration | Risk Level |
|---|---|---|---|
| A / AAAA | Maps domain to IP address | Pointing to decommissioned server | High |
| CNAME | Aliases one domain to another | CNAME at zone apex or conflicting with MX | Medium |
| MX | Routes email to mail servers | Wrong priority values or missing records | High |
| TXT (SPF) | Email sender authorization | Multiple SPF records or syntax errors | High |
| TXT (DMARC) | Email authentication policy | Permissive left in production | Medium |
| NS | Delegates zone to nameservers | Lame delegation to non-responsive NS | Critical |
| CAA | Restricts certificate issuance | Missing entirely, allowing any CA to issue | Medium |
Step 2: Identify and Diagnose Common DNS Misconfigurations
With your audit complete, it is time to systematically identify misconfigurations. Start with the most impactful category: nameserver delegation. Run dig NS yourdomain.com and compare the response with the NS records your registrar has on file. A lame delegation, where the parent zone points to a nameserver that does not actually host your zone, will cause complete resolution failure for some or all queries. This is the most severe DNS misconfiguration and should be fixed first.
Next, check for TTL (Time to Live) values that are either too low or too high. A TTL of 60 seconds on production A records means your DNS provider handles enormous query volumes unnecessarily, while a TTL of 86400 (24 hours) means changes propagate painfully slowly during incidents. For most production records, a TTL between 300 and 3600 seconds strikes a practical balance between performance and agility. During planned migrations, temporarily lower TTLs 24 to 48 hours in advance.
Lowering TTL values before a migration only works if you do it at least one full TTL period ahead of the actual change.
Email-Related Misconfigurations
Email is where DNS misconfigurations cause the most visible business impact. Verify that your MX records resolve to valid hostnames (not bare IP addresses) and that those hostnames have corresponding A records. Check your SPF TXT record for syntax errors using an SPF validation tool. A common mistake is publishing multiple SPF records on the same domain, which causes SPF to fail entirely per RFC 7208. You should have exactly one TXT record starting with per domain.
DKIM and DMARC records deserve equal scrutiny. Confirm that your DKIM selector records exist and contain valid public keys. Your DMARC record at _dmarc.yourdomain.com should specify a policy of "quarantine" or "reject" in production. Leaving it at indefinitely means you are monitoring but not actually protecting against spoofing. For AI-powered domain management tools that can automate these checks, the technology has matured significantly in recent years.
Step 3: Fix DNS Records and Verify Propagation
Now for the actual remediation. Work through your flagged issues in priority order: nameserver problems first, then A/AAAA records, then MX and email authentication, then everything else. Make one change at a time. This is not about being slow; it is about being able to isolate the cause if something breaks. Log each change with a timestamp, the old value, the new value, and the reason for the change. This changelog is invaluable for teams and future audits.
When correcting A records, double-check that the target IP addresses belong to servers you actually control. Use whois lookups or your cloud provider's console to verify IP ownership. For CNAME records, remember that you cannot place a CNAME at the zone apex (e.g., yourdomain.com) alongside other record types. If you need apex-level aliasing, look into ALIAS or ANAME records, which some DNS providers support as proprietary extensions. Fixing this particular misconfiguration often resolves mysterious SSL certificate check failures too, since certificate validation depends on correct DNS resolution.
Never delete an existing DNS record and create a new one simultaneously. Delete first, confirm the deletion propagated, then add the replacement.
Propagation Verification Process
After making each change, verify propagation across multiple geographic locations. Tools like DNS Checker or command-line queries against public resolvers (8.8.8.8, 1.1.1.1, 9.9.9.9) will show whether your update has reached major networks. Keep in mind that propagation is not instantaneous. Even with a 300-second TTL, some recursive resolvers cache aggressively or have minimum TTL enforcement policies. Give each change at least 15 to 30 minutes before declaring it complete.
At the end of this step, every record you flagged in Step 2 should be corrected and verified from at least three independent DNS resolvers. Your email authentication records should pass validation checks. Run a quick dns security check using an online scanner to confirm no new issues were introduced during your fixes. If your domain uses DNSSEC, verify that your signatures are still valid after record changes, since modifying records without re-signing the zone will break DNSSEC validation entirely.
"A single DNS change made in haste can take down email, web, and API services simultaneously. Patience in propagation verification is never wasted."
Step 4: Harden DNS Security and Monitor Ongoing
Fixing misconfigurations is only half the job. Without hardening and monitoring, you will be back in the same situation within months. Start by implementing DNSSEC if you have not already. DNSSEC adds cryptographic signatures to your DNS records, preventing cache poisoning and man-in-the-middle attacks on DNS queries. Most major registrars now support DNSSEC activation through their control panels, though you will need to manage key rollovers periodically.
Add CAA (Certificate Authority Authorization) records to restrict which certificate authorities can issue SSL certificates for your domain. This simple step prevents unauthorized certificate issuance, which is a real attack vector used in phishing campaigns. A basic CAA record looks like: 0 issue "letsencrypt.org". You can add multiple CAA records for each CA you use. Without CAA records, any CA in the world can issue a valid certificate for your domain if an attacker passes their domain validation check.
Set up a CAA record with an "iodef" property to receive email notifications whenever a CA denies a certificate request for your domain.
Recommended Monitoring Practices
Configure automated DNS monitoring that checks your records at regular intervals and alerts you to unauthorized changes. Several services offer this, from basic uptime monitors to comprehensive domain security scan platforms. At a minimum, monitor your A, NS, MX, and TXT records. Set alerts for any record modification, deletion, or addition that was not preceded by a change request in your team's workflow.
Establish a quarterly DNS review cycle. During each review, re-run the audit from Step 1, compare it against your previous baseline, and investigate any discrepancies. This catches configuration drift, forgotten temporary records, and unauthorized modifications. Combine DNS monitoring with SSL certificate expiration tracking, since an expired certificate on a correctly configured domain is just as damaging to users as a DNS misconfiguration. Keep your team trained and your documentation current, because DNS infrastructure outlasts individual administrators.
Frequently Asked Questions
?How do I check if my DNS changes have fully propagated globally?
?Is dig better than nslookup for auditing authoritative nameservers?
?How long does fixing a DNS misconfiguration typically take end to end?
?Can an expired SSL certificate really indicate an underlying DNS problem?
Final Thoughts
DNS misconfigurations are fixable, but they demand a disciplined, methodical approach. By auditing your records, diagnosing issues systematically, applying fixes one at a time, and implementing ongoing monitoring, you build a DNS infrastructure that is both resilient and secure.
The steps in this guide are not a one-time exercise. Treat DNS hygiene like any other operational practice: schedule it, document it, and hold your team accountable. Your domains, your users, and your email deliverability will all benefit from the effort.
Disclaimer: Portions of this content may have been generated using AI tools to enhance clarity and brevity. While reviewed by a human, independent verification is encouraged.