A DNS security check is one of the most effective ways for IT administrators and webmasters to detect threats before they escalate into full-blown incidents. Misconfigured DNS records, expired SSL certificates, and exposed zone files can quietly open doors for attackers, often without triggering any alerts.
Running a regular domain vulnerability scan catches these gaps early, giving you time to remediate instead of scramble. The stakes are real: a single DNS misconfiguration can redirect traffic to malicious servers, expose customer data, or tank your search rankings overnight. This guide walks you through a practical, step-by-step process for conducting a thorough security scan of your domain's DNS infrastructure.
Whether you manage one domain or hundreds, these steps apply universally. As we cover in our complete guide to domain security scanning, proactive detection beats reactive firefighting every time. Let's get into the specifics.
Key Takeaways
- Run a DNS security check at least monthly to catch misconfigurations before attackers exploit them.
- Verify SSL certificate validity and chain integrity as part of every domain vulnerability scan.
- Monitor DNS record changes in real time to detect unauthorized modifications immediately.
- Enable DNSSEC to protect against cache poisoning and man-in-the-middle attacks on lookups.
- Automate your security scan workflow to maintain consistent coverage across all managed domains.
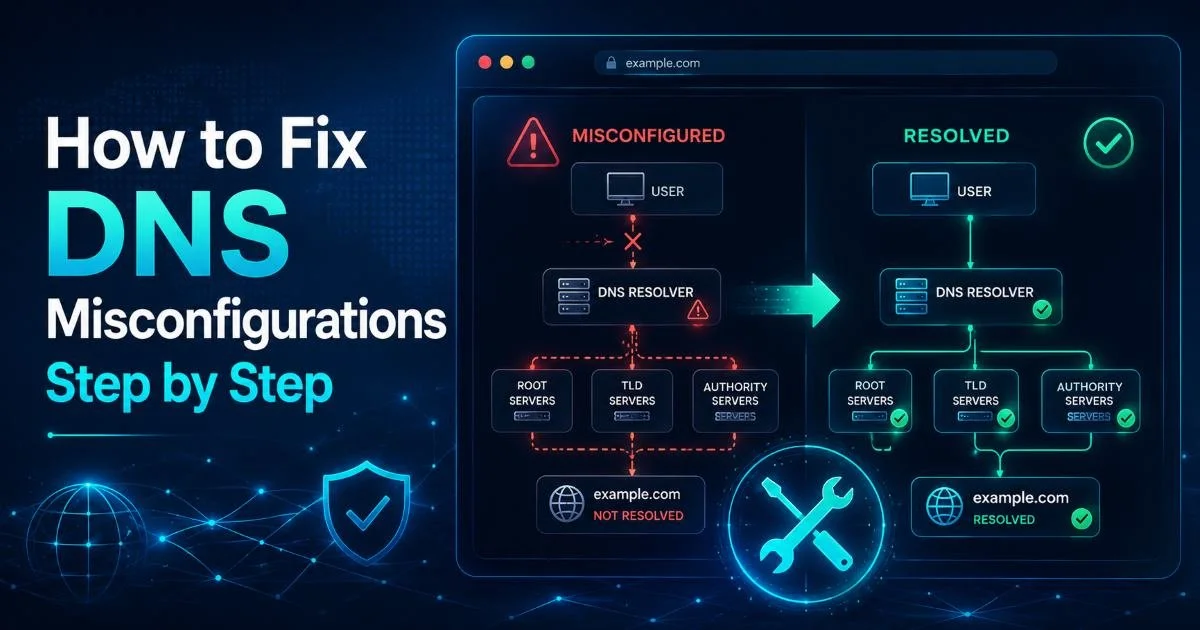
Step 1: Audit Your DNS Records for Misconfigurations
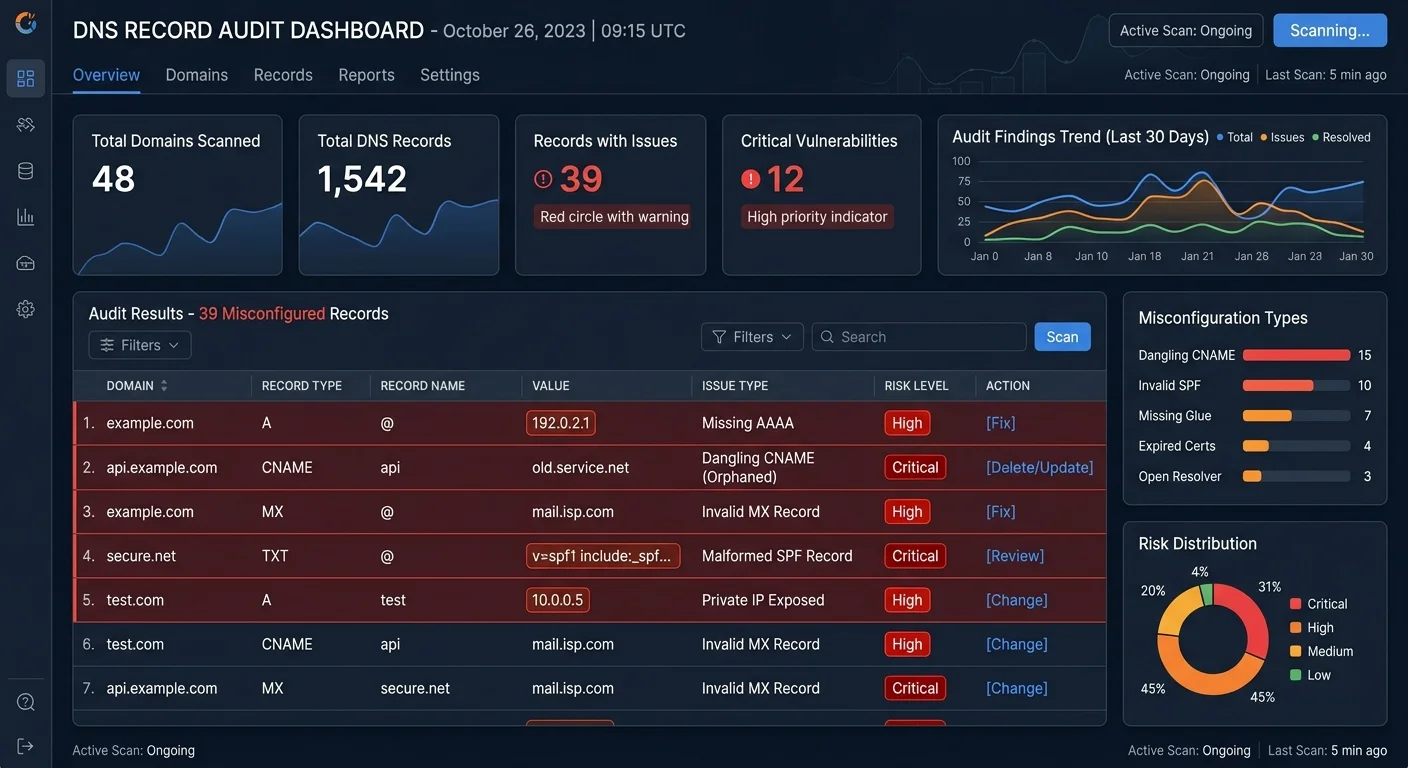
The foundation of any DNS security check starts with a complete audit of your existing records. Pull a full export of your zone file and compare it against your intended configuration. Look for orphaned CNAME records pointing to decommissioned services, stale MX records routing email to old providers, and A records pointing to IP addresses you no longer control. These leftovers are prime targets for subdomain takeover attacks, where an attacker claims the abandoned resource and inherits your domain's trust.
Pay special attention to your SPF, DKIM, and DMARC records. A missing or misconfigured SPF record means anyone can spoof emails from your domain, and that happens more often than most administrators realize. Verify that your SPF record includes only authorized sending IPs, that your DKIM keys are current and properly published, and that your DMARC policy is set to at least "quarantine" rather than "none." These records are frequently overlooked during routine maintenance, but they are direct indicators of your domain's email security posture.
Common DNS Record Issues to Check
Start by querying each record type systematically using tools like dig or nslookup. Cross-reference the results against your documentation. If you don't have documentation, that's problem number one: create it during this audit. For a deeper look at risks associated with poor DNS hygiene, our article on common domain security risks and how to fix them breaks down the most frequent offenders. Flag any record that doesn't match your expected configuration for immediate review.
Orphaned CNAME records pointing to unclaimed cloud services are the number one cause of subdomain takeover attacks. Remove them immediately.
You should also verify your NS records point to your actual nameservers. Attackers who gain access to a registrar account often change NS records first, silently redirecting all resolution to their own infrastructure. Check TTL values too; excessively long TTLs on critical records slow down your ability to respond during incidents, while very short TTLs increase query volume and can signal suspicious activity to monitoring tools.
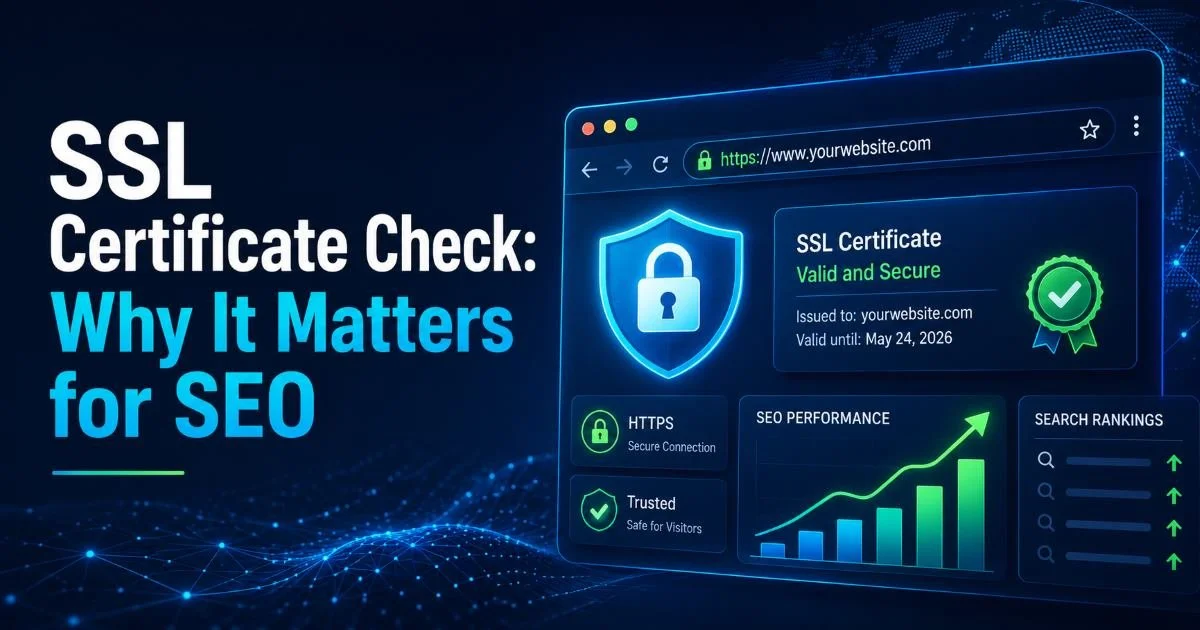
Step 2: Validate SSL Certificates and Chain Integrity
An SSL certificate check should be a non-negotiable part of your regular security scan routine. Expired or misconfigured certificates don't just trigger browser warnings; they actively erode user trust and can break API integrations, webhook deliveries, and service-to-service communication. Use OpenSSL's s_client command or an automated scanner to verify that every certificate in your chain is valid, properly ordered, and issued by a trusted certificate authority. Check every subdomain, not just your primary domain strength.
Certificate transparency logs are another valuable resource. These publicly accessible logs record every certificate issued for your domain. By monitoring them, you can detect unauthorized certificate issuance, which is a strong indicator that someone is attempting a man-in-the-middle attack or has compromised your domain validation process. Services like crt.sh let you search these logs for free. If you find certificates you didn't request, investigate immediately and consider revoking them.
SSL Certificate Check Checklist
| Check Item | Tool / Method | Frequency | Risk If Missed |
|---|---|---|---|
| Certificate expiration date | OpenSSL s_client, automated scanner | Weekly | Browser warnings, broken trust |
| Certificate chain order | SSL Labs, manual verification | After any cert change | Incomplete chain errors |
| Key strength (RSA 2048+ or ECC 256+) | OpenSSL, security scanner | Quarterly | Vulnerable to brute force |
| Certificate transparency monitoring | crt.sh, CT log monitors | Continuous | Unauthorized cert issuance |
| HSTS header presence | Browser dev tools, curl | Monthly | Downgrade attacks |
| Mixed content on HTTPS pages | Browser console, crawlers | After deployments | Partial encryption, warnings |
Understanding why SSL matters beyond security is worth your time. As detailed in our piece on SSL certificate checks and their impact on SEO, search engines actively penalize sites with certificate issues. Google has used HTTPS as a ranking signal since 2014, and modern browsers now display prominent "Not Secure" labels for any page served over plain HTTP. The SEO and trust implications make SSL validation a business priority, not just a technical one.
Set calendar reminders 30, 14, and 7 days before certificate expiration. Better yet, use Let's Encrypt with automated renewal and monitor for renewal failures.
Don't forget to check for protocol and cipher suite configuration. Supporting TLS 1.0 or 1.1 introduces known vulnerabilities, and many compliance frameworks now require TLS 1.2 as a minimum. Disable weak cipher suites like RC4 and 3DES. Test your configuration against tools like Qualys SSL Labs, aiming for an A or A+ rating. This single test covers certificate validity, protocol support, key exchange strength, and cipher suite configuration in one report.
Step 3: Scan for Domain Vulnerabilities and Exposed Data
Beyond DNS records and SSL certificates, a comprehensive domain vulnerability scan examines what information your domain exposes to the public internet. WHOIS records, for example, can reveal administrator email addresses, phone numbers, and physical addresses unless you've enabled privacy protection. Attackers use this data for targeted phishing campaigns and social engineering attacks against your team. Check your WHOIS output and enable registrar privacy where available.
"The most dangerous DNS threats are the ones you never configured, the records left behind from last year's migration that nobody cleaned up."
Zone transfer testing is another step many administrators skip. If your nameserver responds to AXFR requests from unauthorized sources, anyone can download your entire zone file, revealing every subdomain, internal hostname, and IP address mapping. Test this by running dig axfr yourdomain.com @your-nameserver from an external machine. If it returns results, lock it down immediately. Zone transfer restrictions should be configured to allow only your secondary nameservers.
What Vulnerability Scanners Detect
Automated vulnerability scanners go further by checking for open redirects, exposed admin panels, directory listings, and server version headers that reveal your software stack. For a comparison of the best tools available, see our review of top domain vulnerability scan tools compared. The right scanner will check HTTP security headers like Content-Security-Policy, X-Frame-Options, and Referrer-Policy, all of which help mitigate cross-site scripting and clickjacking attacks when properly configured.
If you manage domains across different TLDs, the security posture can vary significantly. A .dev domain, for instance, comes with mandatory HTTPS enforcement baked into the HSTS preload list, while a .com domain requires manual HSTS configuration. Understanding the differences between .dev and .com domains helps you tailor your security scan approach to each TLD's specific characteristics. Don't assume that settings on one domain carry over to another.
Some vulnerability scanners generate high volumes of traffic that may trigger rate limiting or DDoS protection on your target. Always scan from whitelisted IPs during maintenance windows.
Step 4: Implement Continuous DNS Monitoring and Alerts
A one-time DNS security check is useful, but threats don't wait for your next quarterly audit. Continuous monitoring transforms security scanning from a periodic task into an ongoing defense layer. Set up automated monitoring that alerts you when DNS records change, when certificates approach expiration, when new subdomains appear, or when your domain shows up in threat intelligence feeds. The goal is to reduce your detection window from weeks to minutes.
Most monitoring platforms let you define specific triggers. Configure alerts for any change to NS, MX, or A records on your primary domain. Set up certificate expiration warnings at 30-day, 14-day, and 7-day thresholds. Monitor your domain against phishing databases and newly registered lookalike domains that could be used for brand impersonation. These lookalike domains (typosquatting) are surprisingly common and easy for attackers to register, so proactive detection matters.
Choosing the Right Monitoring Tools
The chart above illustrates why continuous monitoring dramatically outperforms manual approaches. A manual audit might catch a DNS misconfiguration weeks after it occurs, while real-time monitoring flags changes in under an hour. When selecting tools, prioritize platforms that support DNS record monitoring, SSL certificate tracking, and subdomain discovery in a single dashboard. Integration with your existing alerting infrastructure (Slack, PagerDuty, email) reduces response time further.
Create a runbook for each alert type so your team knows exactly what to investigate and how to remediate when a notification fires. Response speed depends on preparation.
Document your monitoring configuration alongside your DNS records. Your monitoring setup should be version-controlled and reviewed during change management processes, just like your infrastructure code. When someone adds a new subdomain or changes a DNS record, the corresponding monitoring rules should update in the same change request. This discipline prevents gaps in coverage as your domain infrastructure grows and evolves over time.
Frequently Asked Questions
?How do I find orphaned CNAME records pointing to dead services?
?Is DNSSEC worth enabling if I already run monthly DNS checks?
?How long does a full domain vulnerability scan typically take?
?Does setting DMARC to 'none' actually leave my domain exposed?
Final Thoughts
Running a thorough DNS security check isn't a one-time project; it's a recurring discipline that protects your organization from an expanding landscape of domain-based threats. Start with a complete record audit, validate your SSL certificates and chain integrity, scan for exposed data and vulnerabilities, then wire up continuous monitoring to catch everything between manual reviews.
Each step builds on the last, creating a layered defense that makes DNS misconfiguration and domain exploitation significantly harder for attackers. The tools exist, the processes are straightforward, and the cost of inaction is measured in breached data and lost trust.
Disclaimer: Portions of this content may have been generated using AI tools to enhance clarity and brevity. While reviewed by a human, independent verification is encouraged.